Showing posts with label Recipes. Show all posts

May 22, 2008

Crowning Glory


In the land of the Long White Cloud, just west of the Half Moon Bay, around campfires and in the warmth of the kitchen hearth, they tell the legend of the Wild Rose of Aotearea, a beautiful and noble queen who was a fierce warrior, a graceful chanteuse and was known for the indomitable courage of her convictions. A free spirit living up to her name, she thought that each day was a present and wanted all people to be the very best that they could be every day of their lives. So in honor of this mythical queen and the land whence she comes, here is a dish worthy of royalty.

You will need:


For the roast and the rub:

Two 6-8 rib racks of New Zealand lamb

2 tblsp olive oil

1 tsp kosher salt

1/2 tsp black pepper

6 cloves garlic, minced

1 tblsp each: fresh thyme, parsley, mint, chives and oregano - all chopped. Also, a sprig of rosemary, chopped.

A beer/ soda can

For the stuffing (optional, but why the hell not?!):

A link or two of sausage (or the trimmings from the Frenching of the ribs, if available - see below).
1 onion, chopped
4 cups of mixed mushrooms

1/2 cup chopped parsley

1 can chicken broth

2 tsp dried thyme

2 tsp dried sage or marjoram

2 tblsp butter/ olive oil combo

Salt and pepper to taste


For the sauce:

2 tsp white wine vinegar
1 tsp Dijon mustard

1 tsp honey

1/4 cup finely chopped mint

2 tblsp extra virgin olive oil

Preparation:

Form the crown roast by bending each rack of lamb in a semi-circle and tying together end-to-end, fat side out, at the base and at the center, with twine. Or you can get a prepared crown roast. If this is a DIY project then you will probably need to
'French' the ribs too. In that case save and grind the trimmings to be used for the stuffing.

Preheat the oven to 375 deg F.


Rub the lamb with 1 tblsp olive oil. In a bowl, mix all the rub ingredients with the remaining tablespoon of olive oil and apply to the lamb, pressing hard so it sticks to the meat (you know, actually
rub it in!)

Place the crown roast on a roasting pan, stick the can of beer in the middle to help the roast hold its shape and put the whole thing in the oven for 30-35 mins (130 deg F/ 10 mins per pound).
Remove from the oven, transfer to a plate, tent with foil and allow it rest for 15-20 mins. This is critical!

In the meantime, if you're making the stuffing, now would be the time to do so. Sauté the onion in a medium hot skillet in a olive oil/ butter combination for about 4-5 mins or till onions are soft and translucent. Add the mushrooms, season with salt to draw out the moisture and sauté for another 5 minutes. Add sage and thyme, cook for a minute or two and add the accumulated juices from the roast and the chicken broth. Cook for about 5-6 minutes, add the parsley and adjust seasoning with salt and pepper.

To prepare the sauce, combine the white wine vinegar, Dijon mustard, honey and chopped mint in a bowl, season with salt and pepper and mix in the extra virgin olive oil. You might even give it a pulse or two (no more!) in a food processor.


To serve, cut the string away from the roast, remove the beer can, place the stuffing in the center and serve with the mint sauce.

Carve at the table and you might just get some!


April 04, 2008

Eggs Benedict


Eggs Benedict has consistently been one of my favorite brunch options. For a hearty mid-morning meal, especially when said mid-morning arrives after an ill-spent liquid night, there are few things that are better. Having made many variations of the basic recipe, I consider myself to be a bit of an Eggs Benedict connoisseur. So when Rearset's (much) better half requested my recipe, I was only too happy to pontificate.

There are conflicting histories as to the origins Eggs Benedict - one version, according to the December 19, 1942 issue of The New Yorker, involves the Waldorf hotel in New York, a Wall Street type called Lemuel Benedict trying to cure a hangover and ordering "buttered toast, crisp bacon, 2 poached eggs, & a hooker of hollandaise."

On the other hand, Elizabeth David in her classic 1958 book French Provincial Cooking says that the origins can be traced to a French dish called œufs bénédictine. But then the French believe that all great dishes originated in France so take this as you will.

Whether it was an irate New York broker or a French farmer, I am just glad that someone invented it. On to the recipe, or rather my version of it. This makes one serving.

You will need:
  • Two eggs - at room temperature! Give up the nasty habit of cooking eggs straight out of the fridge!
  • An English muffin, split into half.
  • The traditional recipe calls for Canadian bacon or ham, but I prefer Pancetta. Use as much as you like, but at least enough to cover the muffin halves.
  • A few leafs of Spinach (why leave the Florentine out of the fun?!)
  • A few tomato slices
  • White wine vinegar
  • Hollandaise sauce*
  • Parsley and/ or chives to garnish

Here's how you make it:
In a wide, deep sauce pan bring to a fast rolling boil enough water to completely submerge the eggs. Think like you're cooking pasta - there should be enough water for the eggs to swim around.

Butter the muffin halves and place on a plate - they will form the base of the dish. Render the Pancetta in a medium-low pan till it is heated through and beginning to crisp around the edges. Place on top of the muffins.

Next, the tomato slices, which go atop the Pancetta. At this point hit it with some coarsely ground black pepper. Next up, the spinach.

Blanch the spinach for about 30-seconds to a minute in the water that you already have boiling for the eggs. Remove and 'shock' the leafs in an ice bath. This stops the cooking immediately and keeps the spinach nice and green. Put the spinach on top of the tomato.

Finally, the eggs! Add about 3-4 tbsp of the vinegar to the water. The acid helps the egg to coagulate quickly into a pretty ball instead of turning it into egg-drop soup! When you're ready to add the eggs to the water, turn it down to a simmer (you don't want the egg bouncing around in there), break the eggs into a bowl and then gently slide into the hot water. Depending on how runny you like your yolks, give it 3-6 minutes. Fish out the eggs with a slotted or mesh spoon and set on top of the spinach.

Spoon on the hollandaise sauce, hit it with some parsley and/or chives and serve.

One quick note - As hard as it to imagine, there is a method to the sequence of piling the muffin - put the tomato on top of the muffin and you will have soggy bread. Put the wet eggs on top of the wet tomato and it will slide off.

*Hollandaise Sauce
Beat 3 egg yolks in a double boiler over barely simmering water. Make sure that the water does NOT touch the bottom of the bowl that the yolks are in. Do NOT let the water boil or it will scramble the yolks. When the yolks have thickened add a tablespoon of lemon juice and beat again till the mixture has doubled in volume. Now slowly(!) add half a cup of melted unsalted butter while continuously beating the yolks. When all the butter has been absorbed, fold in a dash of cayenne pepper and beat again till the sauce becomes glossy and smooth. You can hold the sauce over warm water or in a thermos for about an hour but ideally, it should be served immediately.


March 19, 2008

Back to the Basics 08.01 - How to Hard-Boil a Freaking Egg

Since we have already confessed to a man-crush on Anthony Bourdain, who better to tell us than the man himself. From his “Les Halles Cookbook” (2004, pg. 69, Bloomsbury, New York):

“Put your eggs gently into a small pot filled with cold water. Bring the water to a rapid boil. As soon as the water is boiling, shut off the heat and put a lid on top. After 10 minutes, remove the eggs and slide them carefully into ice water to cool. When cool? Peel. Here’s how you know if you’ve done it right: If the egg is cooked through, the shell peels of cleanly, and the yolk is not surrounded by an unsightly gray ring. Gray ring? Try again.”
Couldn’t have put it better myself if I had tried.

March 20, 2007

"Soul in Yo Bowl"

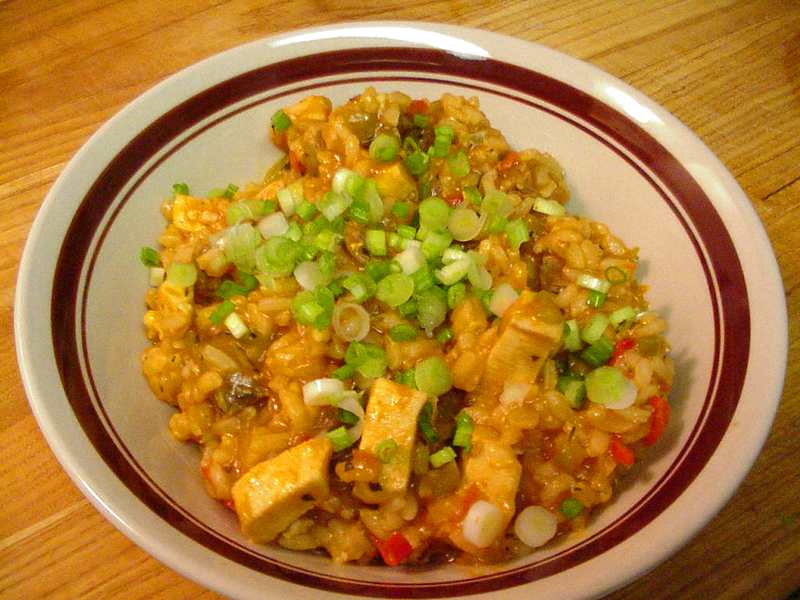
I make a good Jambalaya. I know this because most of the friends who have eaten it have lived to tell the tale. Some have even returned for seconds. And responding to a groundswell of popular demand, and for the greater common good, I feel that it is time that I should share my recipe for a Jambalaya. Vox Populi; Vox Dei and all that sort of thing, don't you know.


Ok, so the popular demand consisted of just one person but if you saw this populus, you'd know that she was all Dei.


Anyway, Jambalaya...


Jambalaya is a Cajun-Creole dish similar, in some ways to a Spanish paella or the Indian pulao (as opposed to the biryani). It originated in the swamps and badlands of Louisiana and according to
Wikipedia, the Jambalaya dates back to at least 1872. Jambalaya can be made with beef, pork, chicken, duck, shrimp, oysters, crayfish, sausage, or any combination thereof or indeed from any other meat as well. If you want to throw in some 'gator in your Jambalaya, go right ahead! I make mine with a combination of chicken, Andouille sausage, Chorizo and shrimp.

But we are getting ahead of ourselves. You have to start at the very beginning, which as Maria von Trapp assures us, is a very good place to start.


And in the beginning, there is the
trinity - equal parts onion, celery and bell peppers, chopped into a fine dice (about a half-cup each). The traditional trinity calls for green bell peppers but I find that just a tad too bitter and use red bell peppers instead (which also adds to the color of the dish, of course). I also throw in a few Jalapeño and/or Serrano peppers to add a little kick, but that is completely a matter of taste. The trinity should be sautéed in a dutch oven or any deep heavy pan , till the onions are transparent but not brown (deep so it can accommodate the rice and the meats without overflowing and heavy so that it retains heat. Do not use a non-stick pan, the reason for which will become clear in a minute). I prefer to use a combination of rendered bacon (pork fat rules!) and vegetable oil as the cooking medium but in these heart healthy times, use whatever oil you're comfortable with - vegetable, canola, peanut, olive; any one will do with two exceptions - extra virgin olive oil and mustard oil - because they have powerful aromas that will overwhelm the dish.

Season aggressively with crushed black pepper, cayenne pepper and Creole seasoning. If you are up to making your own Creole seasoning, here is a great basic recipe, but one can also buy this stuff pre-mixed and some of it is actually edible!

To the sautéing trinity, add the chicken and the sausages, each cut to about half-inch cubes/ slices/ dice - whatever floats your boat really. They should just be the approximate same size. It helps to use just one cut of chicken for e.g breasts (what can I say - I am a breast man!). Figure on using one chicken breast for two people. Season again with the Creole seasoning and sauté on medium heat till the chicken is browned evenly, some of the fat has rendered off the sausages and there is a good bit of 'frond' - the brown sticky bits at the bottom of the pan. The frond is critical to develop the brown color of the Jambalaya and to intensify the flavor; it is virtually impossible to develop a good frond in a non-stick pan. Enameled cast-iron is best, stainless steel is also ok, even hard anodized cookware will work in a pinch.


When the chicken has browned, add the rice (figure about a third to a half-cup per person - long grain rice works best, parboiled rice is fine) and move it around till the grains become sort of translucent. Add a couple of cloves of crushed garlic, move it around till it becomes fragrant and immediately add the cooking liquid for the rice (it happens fast in a hot pan - 30-45 secs - so watch out otherwise the garlic will burn). I like chicken stock but if you prefer fish/vegetable/ beef stock, that's fine. You can use water if you absolutely must but, be warned, it will dilute the flavors of the Jambalaya. You will need more liquid than if you were just cooking rice, so depending upon the type of rice grains you chose, you will need 2-2.5 times liquid. Use the liquid to also de-glaze the pot - scraping around the bottom to release all the frond and color and flavor contained therein.


Cook the rice as you normally would and about five minutes before the rice is done, add the shrimps (about a half-cup per) and some diced scallions. Be careful not to overcook the shrimp - when they turn pink they are done. Adjust seasonings while the Jambalaya is still liquidy and when the rice is done, so is the Jambalaya.


Eat. Enjoy.


Original post

February 08, 2007

The Art of the Omelette

In my Pantheon of superstar foods, the omelette has pride of place in the front row. It can be street food in India, an elegant supper at a French bistro, a hearty lunch in Spain and stuffed to overflowing at an American brunch. It can be eaten for breakfast, lunch or dinner and when you need something to soak up the excesses of a night on the town, the omelette can hang right in there with the fried chicken and the cold pizza.

According to the
Larousse Gastronomique (Robuchon, J., et al (ed), 2001, Clarkson Potter, New York, P.808), "the word [omelette] comes from the French "lamelle" (thin strip) because of its flat shape; previously it was known as alumelle and then alumette, and finally amelette." (So the Indian pronunciation is actually pretty close to the French original!) The French have been making omelettes since the 16th century and the pinnacle of their painstaking effort is the classic recipe known as L'Omelette aux Champignons - Omelette stuffed with Mushrooms.

Making a French omelette is a lot like making tea or making rice. It is very easy to make but very difficult to make well. And just like tea or rice, when an omelette is good it is sublime, when it’s bad, there are few worse abominations on the face of the planet.


I know because I had the misfortune of eating a particularly bad version a couple of days ago, which is what prompted this post. Here are a few critical things to keep in mind when making an omelette. Follow these simple rules of thumb and you will have French bistro quality omelettes - guaranteed.


First, the stuffing. If the omelette is to have a stuffing, make sure you cook it
before you make the omelette. The residual heat of the omelette will reheat the stuffing but if the omelette gets cold while you're making the stuffing, it's all over. For a mushroom stuffing, stick to the middle of the road - you don't want white button mushrooms which are pretty flavorless and get soggy but you don't want shitakes either which will overwhelm the flavor of the eggs. Creminis, in my experience, work best - they will stand up to the eggs with just enough earthy flavors to compliment them. Salt the mushrooms while they are sautéing to draw out the water - you don't want that moisture running out when the stuffing is in the omelette!

Now for the main event -
L'Omelette!
  • Make sure that the eggs are at room temperature. Eggs straight out of the fridge tend to coagulate and don't mix as well when beaten, leading to dense and heavy omelettes.
  • Speaking of beating, the eggs should get a thorough one. Beat the eggs for at least 10 minutes. Don't be shy (or lazy) - I've gone so far as to use a mixer on the eggs but if you have any experience in hand mixing a latte, you can do this with a fork. The more air you can incorporate into the eggs the lighter and fluffier they will be.
  • This one is optional, but instead of just adding milk, try adding a teaspoon or so of cream to the proceedings too (for three eggs. Adjust the amount of cream for fewer or more eggs). Also add a teaspoon or so or water.
  • This one is not optional - use butter as a cooking medium! Not vegetable oil, not olive oil (not even the good stuff) - butter. Say it with me - butter!
  • Cook the omelette slow and low. Well, ok - medium to medium low. But you don't want to crank the heat 'cause that will only burn the outside before the omelette cooks through.
  • This leads us to – non-stick skillets. This is one of the very few recipes where I would recommend using a non-stick skillet over a regular one. Since you don't need to fire up the afterburners, the safety issues with non-stick pans can be overlooked. You can slide the omelette off more easily, the calorie counters can use a little less butter and since non-stick pans generally don't sear very well, you get a nice even golden color on the omelette.
  • And finally, do not cook the omelette all the way through in the pan. Residual cooking will continue after you take the eggs off the heat and you must account for this. If the eggs are completely cooked in the pan, the by the time they get to the table, they will be overdone, dry and stringy. The trick is to take the skillet off the heat when the edges of the omelette have set but the center is still slightly moist and runny. Fold in the stuffing, thus giving that a little time to warm up too. Plate.
Now, there's a good egg, what!

Original post